How To Design a WordPress Website? (12 Steps Easy Guide)

Published: June 18, 2024
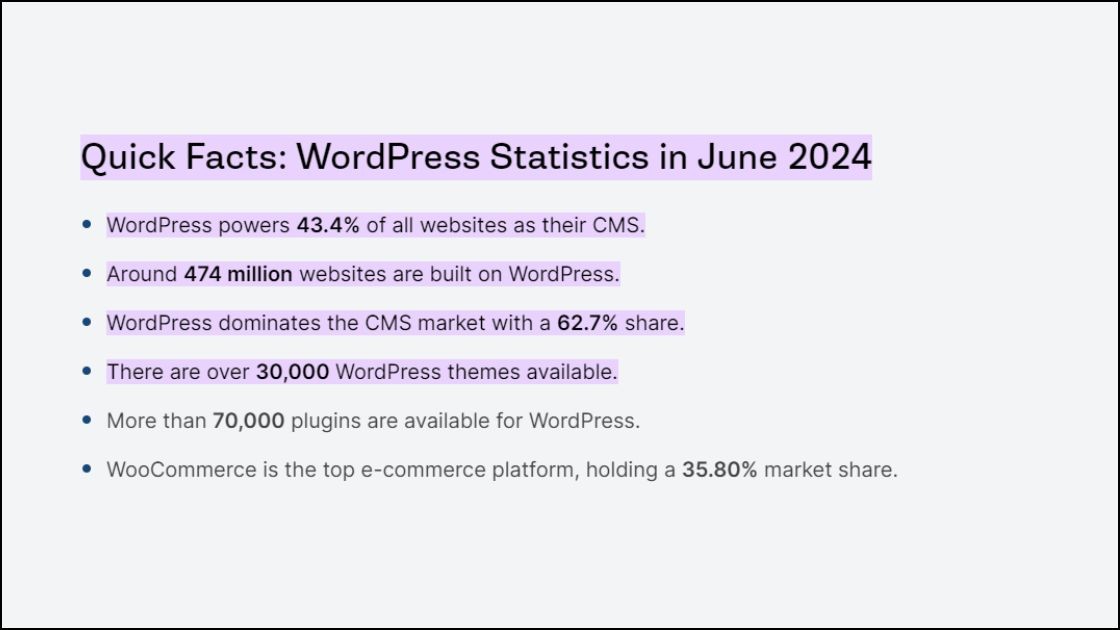
You’re ready to create your WordPress website but unsure where to begin! You’re in good company 43.4% of all websites use WordPress, making it the leader in the CMS market with a whopping 62.7% share. That’s over 474 million websites!
WordPress is renowned for its user-friendliness and versatility, whether you’re setting up a blog, a business site, or an online portfolio. In this guide, our expert designers from the award-winning web design agency Melbourne are here to assist you.
From choosing the perfect theme and plugins to tailoring the design to reflect your unique brand, we’re here to help you every step of the way. We aim to simplify the process and ensure your website looks professional and functions seamlessly.
Ready to turn your vision into a stunning reality? Let’s get started and build a WordPress website that stands out!
12 Easy Steps to Design a WordPress Website
Step 1 – Get Set Up: Domain Name and Hosting
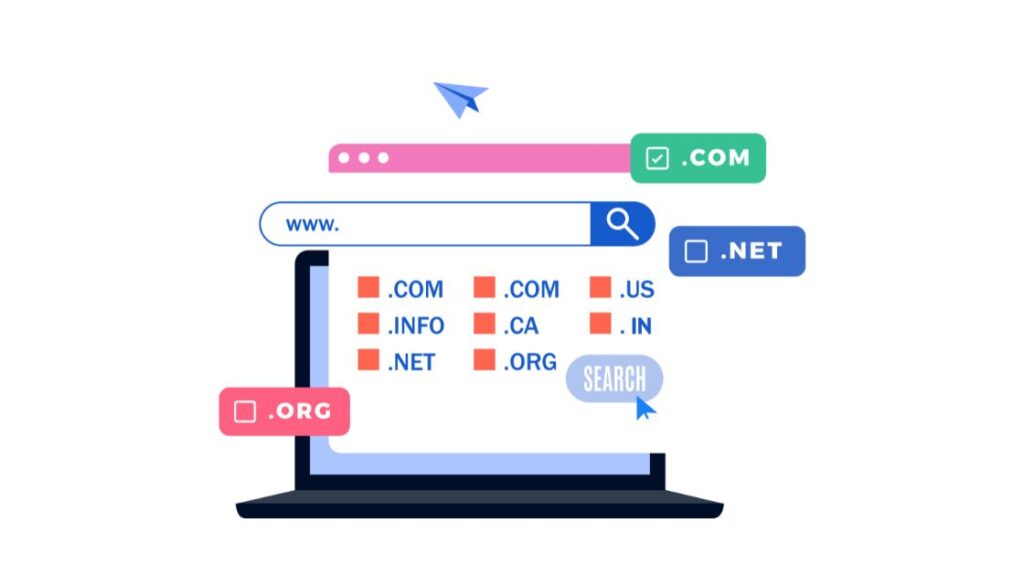
(A). Domain
Just like your online business card, which reflects your brand and leaves a lasting impression on viewers, a domain name is your website’s address on the Internet, which is essential for making your site stand out. Choose a memorable and relevant domain that reflects your business industry, name, and location.
For example, a domain like “MelbourneBakes.com” would be ideal if you run a bakery in Melbourne. Here:
- “Melbourne” indicates your location.
- “Bakes” represents your bakery business.
- “.com” is a popular top-level domain (TLD) that is widely recognised and trusted.
If the domain you want is available, you can purchase it at a lower cost. However, if the domain has already been taken, you might need to pay a significant amount to acquire it. You can also consider other TLD options like:
- “.net” for network services
- “.org” for organisations
- “.com.au” for Australian businesses.
You can check the availability of your chosen domain and explore other options on websites like GoDaddy, Namecheap, or Domain.com.
(B). Hosting
Web hosting is the service that allows your website to be accessible online. It stores all your website’s files and data on a server, which delivers them to users when they visit your site. A reliable hosting provider ensures your site runs smoothly, loads quickly, and remains secure. For WordPress websites, choose a hosting provider that supports WordPress installations.
Popular options include SiteGround, Bluehost, and WP Engine, which offer:
- One-click WordPress installations for easy setup.
- Excellent customer support to help you with any issues.
- Reliable performance to keep your website running efficiently.
Step 2 – Install WordPress

Installing WordPress is a straightforward process. Most hosting providers offer a one-click installation feature, making it easy for beginners. Here’s how to get started:
(A) One-Click Installation
- Log in to your hosting account.
- Look for the WordPress installer in your hosting dashboard.
- Click on the installer and follow the prompts to set up your site.
(B) Manual Installation
- Download the latest version of WordPress from the official website.
- Upload the WordPress files to your web server using an FTP client.
- Create a MySQL database and user for WordPress.
- Run the WordPress installation script by accessing your website in a web browser and following the on-screen instructions.
Due to its simplicity and speed, one-click installation is recommended for beginners. If you choose to install WordPress manually, the official WordPress guide provides detailed instructions.
Step 3 – Choose a WordPress Theme
Your WordPress theme determines the overall look and feel of your website. Here’s how to choose the right one:
(A). Identify Your Needs
Think about the purpose of your website. Are you creating a blog, an online store, or a business site? Your theme should match your site’s purpose and your brand’s style.
(B). Explore Theme Options
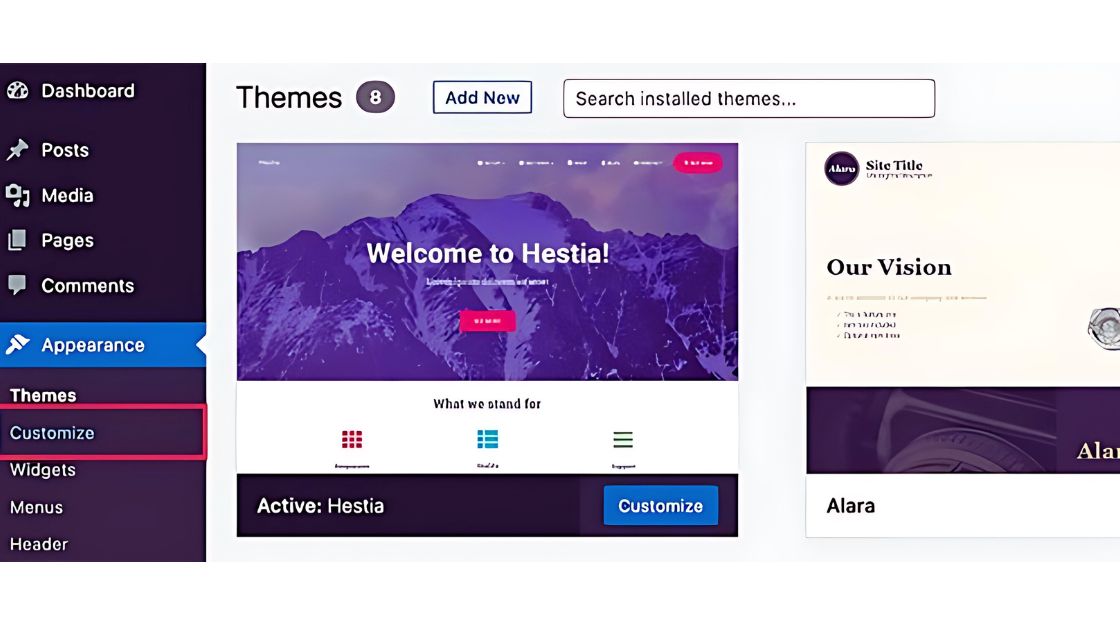
- Free Themes: WordPress offers thousands of free themes in its theme library. To access these, go to your WordPress dashboard, click on “Appearance,” and then “Themes.” You can browse and preview themes to see how they look.
- Premium Themes: For more features and support, consider premium themes from marketplaces like ThemeForest. These often offer additional customisation options and regular updates.
(C). Preview and Test
Before settling on a theme, preview it to see how it looks with your content. Check for responsiveness (how it looks on different devices) and speed. A good theme should be mobile-friendly and load quickly.
(D). Install Your Theme
- From the WordPress Dashboard: Go to “Appearance,” then “Themes,” click “Add New,” find your chosen theme, and click “Install.”
- Upload a Theme: If you purchased a premium theme, download the theme files to your computer. In the WordPress dashboard, go to “Appearance,” then “Themes,” click “Add New,” then “Upload Theme.” Choose the theme file from your computer and click “Install.”
After installation, click “Activate” to make it live on your website. You can now start customising it to fit your brand.
Step 4 – Set Up a Local Development Environment
Setting up a local development environment allows you to build and test your website on your computer before making it live. This is a safe way to experiment without affecting your actual website. Here’s how to do it:
(A). Choose a Tool
- Local by Flywheel: A popular tool for beginners and professionals alike. It’s user-friendly and offers features like one-click WordPress installation and live link sharing.
- MAMP/XAMPP: These tools create a local server environment on your computer, allowing you to run WordPress locally. They are more manual but offer greater control.
- DesktopServer: Another great option, especially for Mac users, offering easy setup and management of local WordPress sites.
(B). Install the Tool
Download and install the tool of your choice. Follow the installation instructions provided by the tool’s website.
(C). Set Up Your Local Site
With Local by Flywheel:
- Open the application and click on “Create a New Site.”
- Enter your site name and choose your environment settings.
- Local by Flywheel will handle the rest, setting up WordPress for you.
With MAMP/XAMPP:
- Open the application and start the servers.
- Create a new database for your WordPress site via phpMyAdmin.
- Download WordPress and place it in the “htdocs” folder (MAMP) or the “www” folder (XAMPP).
- Run the WordPress installation script by accessing “localhost/your-folder-name” in your web browser.
Setting up a local development environment is an intelligent step. It allows you to create, test, and refine your site before it goes live, ensuring a polished final product.
Step 5 – Customise Your Theme
Customising your WordPress theme lets you tailor your website to match your brand’s identity and meet your specific needs. Here’s how to get started:
(A). WordPress Dashboard
The dashboard is your control centre. Here, you can access various customisation tools.
(B). Appearance Menu
- Site Title and Tagline: Go to “Appearance” > “Customise” > “Site Identity” to set your site’s title and tagline. This is crucial for branding and SEO.
- Logo and Favicon: Upload your logo and favicon (the small icon that appears in browser tabs) in the same “Site Identity” section.
- Colours: Adjust the primary colours of your site to match your brand’s palette. This can usually be found under “Colors” in the customiser.
(C). Theme Customiser
- Fonts and Typography: Go to “Appearance” > “Customise” > “Typography” to change your fonts. Choose fonts that reflect your brand’s style and are easy to read.
- Layouts and Design: In the customiser, you can adjust layouts for different sections of your site, such as headers, footers, and sidebars.
- Backgrounds and Images: Customise backgrounds and other visual elements to enhance your site’s appearance.
(D). Widgets
Widgets are small blocks that add specific functions to your site, such as a search bar or recent posts list. You can manage these under “Appearance” > “Widgets.”
(E). Menus
Organise your site’s navigation by setting up menus. Go to “Appearance” > “Menus” to create and manage menus. Ensure that your navigation is intuitive and helps visitors find information easily.
(F). Theme Options Panel
If your theme comes with a theme options panel, it will offer advanced customisation settings. Access this panel via the theme’s settings in the dashboard.
(G). Custom CSS
For more advanced customisation, you can add custom CSS. Go to “Appearance” > “Customise” > “Additional CSS” and enter your custom styles. This requires some knowledge of CSS coding.
Take the time to explore all the customisation options and make your site truly yours.
Step 6 – Create Page Layouts
Designing custom page layouts is crucial for creating a visually appealing and user-friendly website. WordPress offers several tools to help you achieve this, even without coding skills. Here’s how to get started:
(A). Choose a Page Builder Plugin
- Elementor: A popular drag-and-drop page builder with a user-friendly interface. It offers a free version with essential features and a pro version with advanced options.
- Beaver Builder: Another powerful and flexible page builder that allows you to create custom layouts easily. It also offers both free and premium versions.
- Gutenberg Editor: The built-in WordPress block editor, which is great for creating simple layouts using blocks for different types of content.
(B). Install and Activate the Plugin
- Go to your WordPress dashboard.
- Navigate to “Plugins” > “Add New.”
- Search for your chosen page builder plugin (e.g., Elementor or Beaver Builder).
- Click “Install Now,” once installed, click “Activate.”
(C). Create Custom Layouts
Using Elementor or Beaver Builder
- Open a new or existing page.
- Click on the page builder tab (e.g., “Edit with Elementor” or “Page Builder”).
- Use the drag-and-drop interface to add elements like text, images, videos, buttons, and more.
- Customise each element by adjusting settings, styles, and layouts to fit your design vision.
Using Gutenberg Editor
- Open a new or existing page.
- Use the “Add Block” button to insert various blocks, such as paragraphs, images, galleries, headings, and more.
- Arrange the blocks to create your desired layout.
(D). Differentiate Between Pages and Posts
- Pages: Static content that doesn’t change often, such as Home, About, Contact, and Services pages.
- Posts: Dynamic content for your blog, including articles, news updates, and other regularly updated content.
(E). Save and Preview
After creating your layouts, save your changes and preview the page to ensure everything looks and functions as expected. Make adjustments as needed to perfect the design.
Page builder plugins make this process easy, allowing you to design professional layouts without any coding knowledge.
Step 7 – Add Custom Functionality
Enhance your WordPress site by adding new features with plugins.
- Identify your needs, such as SEO, security, contact forms, social media integration, or e-commerce.
- Search for relevant plugins in the WordPress dashboard under “Plugins” > “Add New,” then install and activate them.
- Configure each plugin’s settings to suit your site.
Popular options include –
- Yoast SEO: Improves your site’s search engine optimisation.
- Wordfence Security: Enhances your site’s security.
- Contact Form 7: Adds customisable contact forms.
- WooCommerce: Enables e-commerce functionality for online stores.
- Social Media Share Buttons: Add social media sharing buttons to your content.
For unique features, add custom code to your theme’s functions.php file or hire a developer. Always test new plugins or custom code to ensure your site functions correctly and smoothly.
Step 8 – Design for Mobile and Responsiveness
Ensuring your website looks and works well on all devices, from desktops to smartphones, is crucial. Here are some tips to ensure your website is mobile-friendly.
- Select a theme that is designed to be responsive. Most modern WordPress themes are built with responsiveness in mind. Check the theme’s description and reviews for confirmation.
- Plugins like WP Touch can help make your site more mobile-friendly by creating a mobile-specific version of your site.
- Use tools like Google’s Mobile-Friendly Test to check how your site performs on mobile devices.
- Manually test your website on various devices (smartphones, tablets, desktops) and browsers to ensure it looks good and functions properly across all of them.
- Ensure images and videos are optimised for faster loading times on mobile devices. Use responsive image techniques to serve different image sizes based on the device.
- Make sure your navigation menus are easy to use on smaller screens. Consider using a mobile-friendly menu plugin or a theme with built-in mobile menu support.
- Ensure buttons and links are large enough to be easily tapped with a finger.
- Avoid using Flash or other outdated technologies that may not work on mobile devices.
- Adjust font sizes and line spacing for readability on small screens.
- Use flexible grid layouts that adjust content based on screen size.
- Use CSS media queries to apply different styles based on the device’s screen size. This allows for greater control over how your site looks on various devices.
55% of website traffic is from mobile devices. This step is essential for meeting the expectations of today’s mobile-centric audience and improving your site’s performance in search engine rankings.
Step 9 – Integrate Branding Elements
Consistently integrating your branding elements across your website helps create a cohesive and professional look that reinforces your brand identity. Here’s how to do it:
- Logo: Ensure your logo is prominently displayed on your website, usually in the header. Go to “Appearance” > “Customise” > “Site Identity” to upload your logo.
- Favicon: This is the small icon that appears in browser tabs. Upload it in the same “Site Identity” section.
- Choose a colour palette that aligns with your brand’s colours. Consistently use these colours for headings, links, buttons, and other elements. Adjust these settings under “Appearance” > “Customise” > “Colors.”
- Select fonts that reflect your brand’s style and ensure they are readable. Adjust font settings under “Appearance” > “Customise” > “Typography” or use a plugin like Easy Google Fonts for more options.
- Use high-quality images and graphics that represent your brand. Ensure consistency in style, tone, and quality. Upload images through the media library and use them across your site.
- Maintain a consistent tone and style in your content that matches your brand’s voice. Whether your brand is formal, friendly, or playful, keep this tone uniform across all pages and posts.
- Use consistent layouts for pages and posts to provide a uniform look. This includes using the same spacing, alignment, and design patterns throughout your site.
- Add social media icons linking to your profiles. Place these in the header, footer, or sidebar for easy access. You can do this via widgets or plugins like Simple Social Icons.
This not only enhances the user experience but also builds trust and recognition with your audience.
Step 10 – Optimise for Performance and SEO
(A). Performance Enhancements
Enhance your website’s loading speed and responsiveness by implementing-
- Caching with plugins like W3 Total Cache,
- Compressing images with Smush,
- Minifying CSS and JavaScript via Autoptimise.
- Utilise GZIP compression to reduce data size, and deploy a CDN like Cloudflare to improve global load times.
- Regular database optimisation with WP-Optimise ensures your site runs smoothly, crucial for maintaining user engagement and reducing bounce rates.
(B). SEO Strategies
Boost your site’s visibility and search rankings by using SEO plugins like Yoast, conducting thorough keyword research, and optimising on-page content. To contribute better to SEO, opt for
- Strategic keyword placement,
- Creating XML sitemaps,
- Using clean URLs,
- Enhancing internal linking.
Regular monitoring with tools like Google Analytics and Google Search Console helps you understand visitor behavior and refine strategies, increasing organic traffic and improving user experience. These optimisations are essential for attracting more visitors and achieving a competitive edge in search results.
Step 11 – Test Thoroughly
Comprehensive testing is critical to ensure your website functions correctly, is user-friendly, and performs optimally across all devices and browsers before going live.
- Test all interactive elements like forms and buttons. Check for plugin compatibility and functionality.
- Evaluate navigation intuitiveness, text readability, and graphic alignment. Ensure the design is consistent and visually appealing.
- Use automated tools and manual testing on various devices to ensure proper display and functionality on all screen sizes.
- Use tools like Google PageSpeed Insights to assess and optimise site speed. Address issues like slow-loading resources and image compression.
- Perform security checks, update software, and ensure secure data transfer, especially for sensitive information.
- Check SEO practices like meta tags and alt texts, ensuring all pages are indexed and visible to search engines.
- Gather and analyse user feedback to identify usability issues and areas for improvement, adjusting the site accordingly.
This streamlined approach ensures every aspect of your website is polished, enhancing user satisfaction and readiness for launch.
Step 12 – Launch and Maintain
(A). Launch
Once you’ve thoroughly tested your website and ensured everything functions perfectly, it’s time to launch. Here’s how to go about it:
Prepare for Launch
- Double-check all content for accuracy, spelling, and grammar.
- Ensure all functionalities are working correctly, and final tests are complete.
- Set up any necessary analytics tools, such as Google Analytics, to track website performance.
Go Live
- Transfer your website from the local server or staging area to the live server.
- Update DNS settings to point your domain to the new website.
- Once DNS changes propagate, your site will be visible to the public.
(B). Maintain
Maintaining your website is crucial for ongoing success and security.
Regular Updates
- Regularly update WordPress, themes, and plugins to their latest versions to secure your site from vulnerabilities and ensure optimal performance.
- Back up your website frequently to prevent data loss.
Monitor Performance
- Continuously monitor your website’s performance and optimise based on insights from analytics tools.
- Check for broken links, page load times, and user engagement metrics to improve the user experience.
Engage with Visitors
- Respond to comments and queries to build a community around your site.
- Update content regularly to keep it fresh and relevant for returning visitors.
SEO Optimisation
- Keep improving your SEO by updating content, optimising keywords, and following the latest SEO trends and guidelines.
Security Monitoring
- Regularly scan your site for security threats and address any issues immediately.
- Consider using a security service or plugin for continuous monitoring and protection.
By keeping your site updated, secure, and responsive to visitor interactions, you’ll establish a reliable and engaging online presence.
Conclusion
Designing a WordPress website involves a series of essential steps, each crucial for ensuring your site is functional and visually appealing. Our experts at BrandVillage have detailed each stage of the process to help you understand the complexities involved in website creation.
As a client preparing to collaborate on a website design, being informed about these steps is beneficial to ensure transparency and alignment with your expectations throughout the development process. But when working with BrandVillage, you don’t need to be an expert in web design; we provide detailed insights at every stage, ensuring your site meets your vision.
Ready to launch your WordPress website with ease? Connect with BrandVillage, where our commitment to clarity, quality, and customer satisfaction makes us the perfect partner for bringing your digital vision to life.
Articles.

July 2024
What is a Website Hosting Service?
Did you know that 88% of web users abandon sites due to poor performance? Also,...

July 2024
What is Branding in Marketing?
Branding sets a business apart, influencing: 34.6% of shoppers to repurchase 89% buy from...

July 2024
7 Commonly Used Branding Strategy
In Melbourne’s vibrant and ever-evolving market, a strong brand is no longer an option;...